Outlook: wijzig de map waar verzonden items worden opgeslagen
In Outlook worden verzonden e-mailberichten normaal gesproken automatisch opgeslagen in de map Verzonden Items. Het kan echter georganiseerder of efficiënter zijn om deze berichten in een andere map op te slaan. Deze handleiding laat u eenvoudige trucs zien om de standaardmap Verzonden Items te wijzigen, zodat u uw verzonden e-mails gemakkelijk naar alternatieve mappen kunt omleiden in Microsoft Outlook.
Wijzig de map waar verzonden items worden opgeslagen tijdens het opstellen
Wijzig de map waar alle verzonden items automatisch worden opgeslagen
Wijzig de map waar verzonden items worden opgeslagen tijdens het opstellen
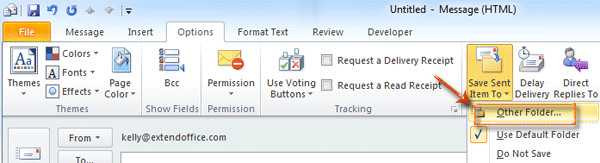
Tijdens het opstellen van een e-mailbericht kunt u een alternatieve map definiëren waarin dit verzendende e-mail na het verzenden wordt opgeslagen.
Stap 1: Klik op Verzonden item opslaan in > Andere map in de groep Meer opties op het tabblad Opties in het Berichtvenster.
Stap 2: Selecteer en markeer een map in het dialoogvenster Map selecteren in het vak Mappen:, en klik op de knop OK.
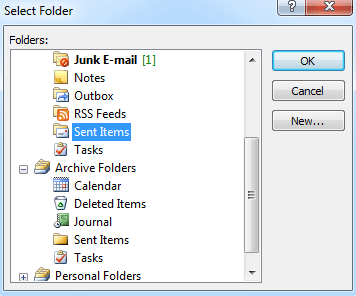
Nadat u dit e-mailbericht hebt verzonden, wordt een kopie ervan automatisch opgeslagen in de map die u in Stap 2 hebt geselecteerd.
AI Mail Assistant in Outlook: Slimmere antwoorden, duidelijkere communicatie (één-klik magie!) GRATIS
Stroomlijn uw dagelijkse Outlook-taken met de AI Mail Assistant van Kutools voor Outlook. Deze krachtige tool leert uit uw eerdere e-mails om intelligente en nauwkeurige reacties te bieden, uw e-mailinhoud te optimaliseren en u te helpen berichten moeiteloos op te stellen en te verfijnen.

Deze functie ondersteunt:
- Slimme antwoorden: Ontvang reacties die zijn samengesteld uit uw eerdere gesprekken - afgestemd, precies en klaar voor gebruik.
- Verbeterde inhoud: Automatisch uw e-mailtekst verfijnen voor meer duidelijkheid en impact.
- Makkelijke samenstelling: Geef slechts trefwoorden op en laat AI de rest doen, met meerdere schrijfstijlen.
- Intelligente uitbreidingen: Breid uw gedachten uit met contextbewuste suggesties.
- Samenvatting: Krijg direct een beknopt overzicht van lange e-mails.
- Wereldwijde bereik: Vertaal uw e-mails eenvoudig in elke taal.
Deze functie ondersteunt:
- Slimme e-mailreacties
- Geoptimaliseerde inhoud
- Op trefwoorden gebaseerde concepten
- Intelligente inhoudsuitbreiding
- E-mailsamenvatting
- Meertalige vertaling
Het beste van alles is dat deze functie voor altijd volledig gratis is! Wacht niet langer — download AI Mail Assistant nu en geniet
Wijzig de map waar alle verzonden items automatisch worden opgeslagen
In sommige gevallen wilt u mogelijk de standaardmap Verzonden Items wijzigen en alle verzonden e-mailberichten automatisch in een specifieke map laten opslaan. We zullen u begeleiden bij het realiseren hiervan door een regel te maken in Outlook.
Voordat u een regel maakt, moet u overschakelen naar de Mailweergave door op Mail te klikken in het navigatiepaneel.
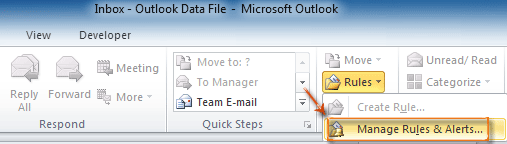
Stap 1: Open het dialoogvenster Regels en waarschuwingen:
Klik op Regels > Regels beheren en waarschuwingen in de groep Verplaatsen op het tabblad Start.
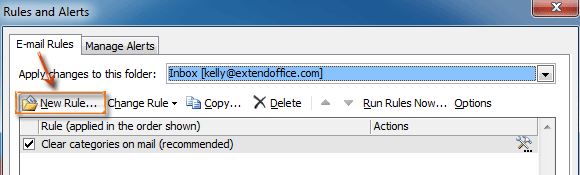
Stap 2: Klik in het dialoogvenster Regels en waarschuwingen op de knop Nieuwe regel op het tabblad E-mailregels.
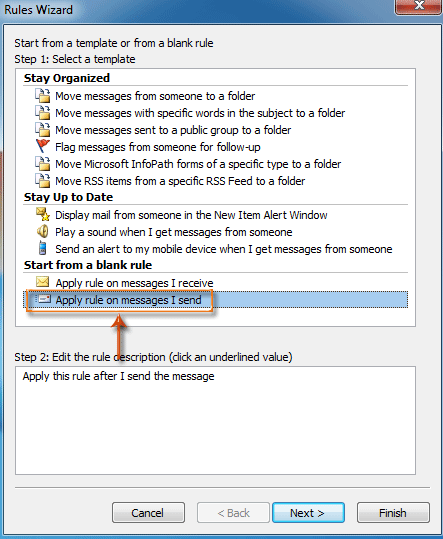
Stap 3: Selecteer en markeer de optie Regel toepassen op berichten die ik verzend in de sectie Beginnen met een lege regel in het dialoogvenster Regelwizard, en klik op de knop Volgende.
Stap 4: In het nieuwe dialoogvenster Regelwizard
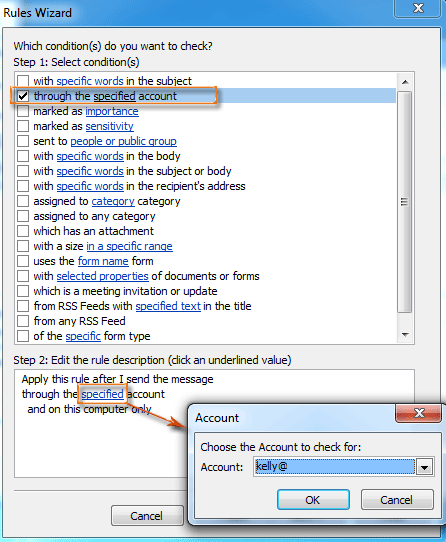
- Vink de optie via het gespecificeerde account aan in de sectie Stap 1: selecteer voorwaarde(n).
- Klik op gespecificeerd in de sectie Stap 2: Bewerk de regelbeschrijving.
- Selecteer een account in het dialoogvenster Account in het vak Account: en klik op de knop OK.
- Klik op de knop Volgende .
Stap 5: In het nieuwe dialoogvenster Regelwizard
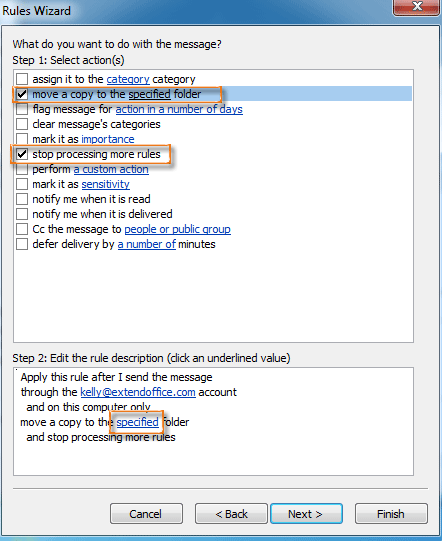
- Vink de optie een kopie verplaatsen naar de gespecificeerde map en stop met het verwerken van meer regels aan in de sectie Stap 1: selecteer actie(s).
- Klik op gespecificeerd in de sectie Stap 2: Bewerk de regelbeschrijving.
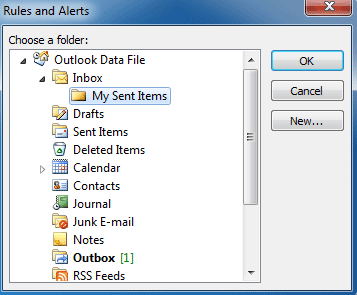
- Selecteer een map in het dialoogvenster Regels en waarschuwingen en klik op de knop OK.
- Klik op de knop Volgende.
Stap 6: Klik verder op de knoppen Volgende en Voltooien in de volgende dialoogvensters.
Vanaf nu worden alle verzonden e-mailberichten automatisch opgeslagen in de map die u in Stap 5 hebt geconfigureerd.
Beste Office-productiviteitstools
Breaking News: Kutools for Outlook lanceert een gratis versie!
Ervaar de geheel nieuwe Kutools for Outlook met meer dan100 fantastische functies! Klik om nu te downloaden!
📧 E-mailautomatisering: Automatisch antwoorden (Beschikbaar voor POP en IMAP) / Schema E-mail verzenden / Automatisch CC/BCC per Regel bij Verzenden / Automatisch doorsturen (Geavanceerde regels) / Begroeting automatisch toevoegen / Meerdere ontvangers automatisch opsplitsen naar individuele E-mail...
📨 E-mailbeheer: E-mail terughalen / Scam-e-mails blokkeren op onderwerp en anderen / Duplicaat verwijderen / Geavanceerd Zoeken / Organiseer mappen...
📁 Bijlagen Pro: Batch opslaan / Batch loskoppelen / Batch comprimeren / Automatisch opslaan / Automatisch loskoppelen / Automatisch comprimeren...
🌟 Interface-magie: 😊Meer mooie en gave emoji's / Herinneren wanneer belangrijke e-mails binnenkomen / Outlook minimaliseren in plaats van afsluiten...
👍 Wonders met één klik: Antwoord Allen met Bijlagen / Anti-phishing e-mails / 🕘Tijdzone van de afzender weergeven...
👩🏼🤝👩🏻 Contacten & Agenda: Batch toevoegen van contacten vanuit geselecteerde E-mails / Contactgroep opsplitsen naar individuele groepen / Verjaardagsherinnering verwijderen...
Gebruik Kutools in je voorkeurt taal – ondersteunt Engels, Spaans, Duits, Frans, Chinees en meer dan40 andere talen!


🚀 Eén klik downloaden — Ontvang alle Office-invoegtoepassingen
Sterk aanbevolen: Kutools for Office (5-in-1)
Met één klik download je vijf installatiepakketten tegelijk — Kutools voor Excel, Outlook, Word, PowerPoint en Office Tab Pro. Klik om nu te downloaden!
- ✅ Eén-klik gemak: Download alle vijf de installaties in één actie.
- 🚀 Klaar voor elke Office-taak: Installeer de invoegtoepassingen die je nodig hebt, wanneer je ze nodig hebt.
- 🧰 Inclusief: Kutools voor Excel / Kutools for Outlook / Kutools voor Word / Office Tab Pro / Kutools voor PowerPoint