Ga naar hoofdinhoud

Hoe kopieer ik een afspraak naar een andere dag in de Outlook-agenda?

In de agenda van Outlook probeerde ik een afspraak naar een andere dag te kopiëren door te kopiëren en plakken. Alleen het onderwerp van de afspraak werd echter gekopieerd, zoals hieronder wordt getoond. Maar ik moet de hele afspraak kopiëren, behalve de begin- / einddatum, ideeën?


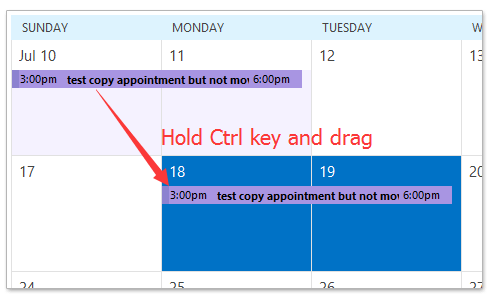
Kopieer een afspraak naar een andere dag in de Outlook-agenda met de Ctrl-toets

In het Agenda weergave van Outlook, selecteer de afspraak die u wilt kopiëren, sleep deze naar een andere dag met de Ctrl -toets en laat de muis los.

En nu wordt de geselecteerde afspraak exact naar een andere dag gekopieerd behalve de startdatum en einddatum. Zie screenshot:


Kopieer een afspraak naar een andere dag in de Outlook-agenda met de rechtermuisknop

In het Agenda weergave van Outlook, sleep de afspraak met de rechtermuisknop ingedrukt, laat de muis los tot de opgegeven dag waarnaar u wilt kopiëren en selecteer vervolgens de Kopiëren uit het pop-up contextmenu. Zie screenshot:

En nu wordt de afspraak gekopieerd naar de opgegeven dag in de agenda in Outlook. Zie screenshot:

Stuur automatisch elke e-mail door naar de opgegeven ontvanger in Outlook

Over het algemeen kunnen we een regel instellen om e-mails automatisch door te sturen naar de opgegeven ontvangers, zoals uw andere e-mailaccount, uw Gmail of uw collega's, enz. Maar we weten alleen dat het lang zal duren om een ​​aangepaste regel te configureren in Outlook. Nu introduceren we Kutools voor Outlook (Automatisch) Naar voren functie, die een regel voor automatisch doorsturen kan instellen met slechts enkele klikken.


automatisch doorsturen van e-mails

Gerelateerde artikelen


Beste Office-productiviteitstools

Kutools for Outlook - Meer dan 100 krachtige functies om uw Outlook een boost te geven

🤖 AI Mail-assistent: Directe professionele e-mails met AI-magie: met één klik geniale antwoorden, perfecte toon, meertalige beheersing. Transformeer e-mailen moeiteloos! ...

???? Email Automation: Niet aanwezig (beschikbaar voor POP en IMAP)  /  Plan het verzenden van e-mails  /  Automatische CC/BCC volgens regels bij het verzenden van e-mail  /  Automatisch doorsturen (geavanceerde regels)   /  Begroeting automatisch toevoegen   /  Splits e-mails van meerdere ontvangers automatisch op in individuele berichten ...

📨 email management: Gemakkelijk e-mails herinneren  /  Blokkeer zwendel-e-mails van onderwerpen en anderen  /  Verwijder dubbele e-mails  /  Uitgebreid Zoeken  /  Consolideer mappen ...

📁 Bijlagen ProBatch opslaan  /  Batch losmaken  /  Batchcompressie  /  Automatisch opslaan   /  Automatisch loskoppelen  /  Automatisch comprimeren ...

???? Interface-magie: 😊Meer mooie en coole emoji's   /  Verhoog uw Outlook-productiviteit met weergaven met tabbladen  /  Minimaliseer Outlook in plaats van te sluiten ...

???? Wonderen met één klik: Beantwoord iedereen met inkomende bijlagen  /   Antiphishing-e-mails  /  🕘Toon de tijdzone van de afzender ...

👩🏼‍🤝‍👩🏻 Contacten en agenda: Batchcontacten toevoegen uit geselecteerde e-mails  /  Splits een contactgroep in individuele groepen  /  Verwijder verjaardagsherinneringen ...

Over 100 Eigenschappen Wacht op je verkenning! Klik hier om meer te ontdekken.


Comments (12)
Rated 5 out of 5 · 1 ratings
This comment was minimized by the moderator on the site
Muito obrigado! Funciona e é simples e rápido de fazer. A explicação com as imagens ajudou muito.
Rated 5 out of 5
This comment was minimized by the moderator on the site
I was able to follow Bethanne's comments and was successful after cursing MS on this for months. THANKS! "Find your folders pane. Mine is on the left of the screen and shows just two months over the list of folders. One can resize the folders pane to reveal more months. There's a border between the folders pane and the main calendar view. Hover over that border and your cursor arrow changes to the column resize icon. Now drag the border over to make the folders pane bigger and the main view smaller. More months will appear in the folders pane." Then, follow the suggestion to hold CTRL to copy while dragging the appointment you want to duplicate to the new callendar location, and DROP it.
This comment was minimized by the moderator on the site
On the left side of your screen should be a folder pane. Open and pin it to stay open, if it is not already. Click on the date of the appointment/meeting you want to copy. Then find the date in the control pane you want to copy the appointment/meeting to. Hold the ctrl button while clicking on the date(s) you want to copy to. All chosen date should appear on your screen. Then you can use the drag and drop with right click on the mouse, or hold ctrl while drag & dropping to the next date(s).
This comment was minimized by the moderator on the site
On my machine, any of the copy-paste methods (inc. ctrl+c, ctrl+v) do not copy the reminder - the one thing that definitely should be copied!
This comment was minimized by the moderator on the site
Thank you, thank you, thank you for posting this!
This comment was minimized by the moderator on the site
On a Macintosh computer, you hold down the Option key, then click and drag the item to a different day.
This comment was minimized by the moderator on the site
Copying the appointment by dragging doesn't work if the target date is not visible on the screen. The calendar does not scroll while you are dragging the appointment.
This comment was minimized by the moderator on the site
Hi,
Here is a workaround may help you.
Drag to copy the appointment to any one date close to the target appointment, and then modify the start date and end date of the new appointment.
Hope it helpful!
This comment was minimized by the moderator on the site
Agree, this is what I am trying to do as well. Anyone found a solution?
This comment was minimized by the moderator on the site
Did you find an answer for this, Guy? I need to know the very same thing.
This comment was minimized by the moderator on the site
Sandra's got the right answer, but I'll be more specific: Find your folders pane. Mine on the left of the screen and shows just two months over the list of folders. One can resize the folders pane to reveal more months. There's a border between the folders pane and the main calendar view. Hover over that border and your cursor arrow changes to the column resize icon. Now drag the border over to make the folders pane bigger and the main view smaller. More months will appear in the folders pane. It drove me absolutely crazy until I figured this out.
This comment was minimized by the moderator on the site
where you can view multiple months on the side or wherever you position them, you can view more than a year's worth if you click and drag the dragger* (sorry i don't know the correct term) you can then right-click your calendar invite, drag & drop it onto any day you choose
There are no comments posted here yet
Please leave your comments in English
Posting as Guest
×
Rate this post:
0   Characters
Suggested Locations