Ga naar hoofdinhoud

Hoe maak je een opdrachtknop om gegevens in Excel te kopiëren en te plakken?

Stel dat u regelmatig een reeks cellen naar een andere plaats moet kopiëren nadat u de gegevens hebt gewijzigd, dan zal de handmatige kopieer- en plakmethode lastig en tijdrovend zijn. Hoe zorg je ervoor dat deze kopieer- en plak-affaire automatisch wordt uitgevoerd? In dit artikel wordt uitgelegd hoe u een opdrachtknop gebruikt om gegevens met slechts één klik te kopiëren en te plakken.

Maak een opdrachtknop om gegevens met VBA-code te kopiëren en te plakken


Maak een opdrachtknop om gegevens met VBA-code te kopiëren en te plakken

Ga als volgt te werk om gegevens automatisch te kopiëren en te plakken wanneer u op een opdrachtknop klikt.

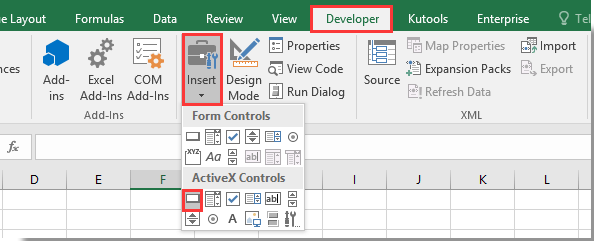
1. Voeg een Command-knop in door te klikken Ontwikkelaar > Invoegen > Commandoknop (ActiveX-besturingselement). Zie screenshot:

2. Teken een opdrachtknop in uw werkblad en klik er met de rechtermuisknop op. Selecteer Bekijk code vanuit het contextmenu.

3. In het opduiken Microsoft Visual Basic voor toepassingen venster, vervang dan de originele code in het codevenster door onderstaande VBA-code.

VBA-code: gebruik de Command-knop om gegevens in Excel te kopiëren en te plakken

Private Sub CommandButton1_Click()
    Application.ScreenUpdating = False
    Dim xSheet As Worksheet
    Set xSheet = ActiveSheet
        If xSheet.Name <> "Definitions" And xSheet.Name <> "fx" And xSheet.Name <> "Needs" Then
            xSheet.Range("A1:C17 ").Copy
            xSheet.Range("J1:L17").PasteSpecial Paste:=xlValues, Operation:=xlNone, SkipBlanks:=False, Transpose:=False
        End If

    Application.ScreenUpdating = True
End Sub

Note: In de code is CommandButton1 de naam van uw ingevoegde Command-knop. A1: C17 is het bereik dat u moet kopiëren en J1: L17 is het doelbereik om gegevens te plakken. Wijzig ze indien nodig.

4. druk op anders + Q toetsen om de Microsoft Visual Basic voor toepassingen venster. En schakel de ontwerpmodus uit onder het tabblad Ontwikkelaar.

5. Klik nu op de Command-knop, alle gegevens in bereik A1: C17 worden gekopieerd en geplakt in bereik J1: L17 zonder de celopmaak.


Gerelateerde artikelen:

Beste Office-productiviteitstools

🤖 Kutools AI-assistent: Een revolutie teweegbrengen in de data-analyse op basis van: Intelligente uitvoering   |  Genereer code  |  Aangepaste formules maken  |  Analyseer gegevens en genereer grafieken  |  Roep Kutools-functies aan...
Populaire functies: Zoek, markeer of identificeer duplicaten   |  Verwijder lege rijen   |  Combineer kolommen of cellen zonder gegevens te verliezen   |   Ronde zonder formule ...
Super opzoeken: Meerdere criteria VLookup    VLookup met meerdere waarden  |   VOpzoeken over meerdere bladen   |   Fuzzy opzoeken ....
Geavanceerde vervolgkeuzelijst: Maak snel een vervolgkeuzelijst   |  Afhankelijke vervolgkeuzelijst   |  Multi-select vervolgkeuzelijst ....
Kolom Beheerder: Voeg een specifiek aantal kolommen toe  |  Kolommen verplaatsen  |  Schakel de zichtbaarheidsstatus van verborgen kolommen in  |  Vergelijk bereiken en kolommen ...
Uitgelichte functies: Raster focus   |  Ontwerpweergave   |   Grote formulebalk    Werkmap- en bladbeheer   |  resource Library (Auto-tekst)   |  Datumkiezer   |  Combineer werkbladen   |  Cellen coderen/decoderen    Stuur e-mails per lijst   |  Super filter   |   Speciaal filter (filter vet/cursief/doorhalen...) ...
Top 15 gereedschapsets12 Tekst Tools (toe te voegen tekst, Tekens verwijderen, ...)   |   50+ tabel Types (Gantt Chart, ...)   |   40+ Praktisch Formules (Bereken leeftijd op basis van verjaardag, ...)   |   19 Invoeging Tools (QR-code invoegen, Afbeelding invoegen vanaf pad, ...)   |   12 Camper ombouw Tools (Getallen naar woorden, Currency Conversion, ...)   |   7 Samenvoegen en splitsen Tools (Geavanceerd Combineer rijen, Gespleten cellen, ...)   |   ... en meer

Geef uw Excel-vaardigheden een boost met Kutools voor Excel en ervaar efficiëntie als nooit tevoren. Kutools voor Excel biedt meer dan 300 geavanceerde functies om de productiviteit te verhogen en tijd te besparen.  Klik hier om de functie te krijgen die u het meest nodig heeft...

Omschrijving


Office-tabblad Brengt een interface met tabbladen naar Office en maakt uw werk veel gemakkelijker

  • Schakel bewerken en lezen met tabbladen in Word, Excel, PowerPoint in, Publisher, Access, Visio en Project.
  • Open en maak meerdere documenten in nieuwe tabbladen van hetzelfde venster in plaats van in nieuwe vensters.
  • Verhoogt uw productiviteit met 50% en vermindert honderden muisklikken voor u elke dag!
Comments (61)
Rated 4.5 out of 5 · 2 ratings
This comment was minimized by the moderator on the site
hello! have good day. i have a problem plz anyone could helpme. i have a data in my excel sheet. it has three types Plaining, Release and archive. I need a code such that when i click on Release the entire row cut from active sheet and pasted to another sheet i-e Released PR's. similarly when i click on archive the entire row cut from active PR's to Archived PR's sheet. i will be thank full if anyone help me as soon as possible.
Rated 4.5 out of 5
This comment was minimized by the moderator on the site
Hola, este mismo codigo funciona con power point? Pregunto por que necesito copiar y pegar la información de una diapositiva a otra. Muchas gracias.
This comment was minimized by the moderator on the site
Hi Ivan,
We only provide VBA scripts for Microsoft Excel, Word and Outlook. This VBA script does not apply to PowerPoint. Sorry for the inconvenience.
This comment was minimized by the moderator on the site
Cảm ơn bạn
Rated 4.5 out of 5
This comment was minimized by the moderator on the site
Cara, eu preciso copiar determinado dados, que são gerados todos os dias, mas salvos em planilhas diferentes, eu já criei a macro e salvei na PERSONAL, para conseguir usar em todas planilhas que abrir, mas não estou conseguindo colocar o código pra ele pegar esses dados, que se localizam sempre na mesma linha e coluna, ele sempre pega da planilha que eu realizei a macro, consegue me ajudar com isso ? Seria um código que sempre pega da planilha atual, aberta, e não da qual eu gravei a macro
This comment was minimized by the moderator on the site
Hi Gabriel,
If you need to copy data in different worksheets each time, you do not need to run the code with a command button.
After pressing the Alt + F11 keys to open the Basic Visual editor, click Insert > Module, and then copy the following VBA code into the Module (Code) window.
To copy data in any worksheet, you just need to open the worksheet, click Develper > macros to open the Macro window, select the macro name "CopyData" and then click the Run button to run the code.
https://www.extendoffice.com/images/stories/comments/comment-picture-zxm/copy_data.png

Sub CopyData()
    Application.ScreenUpdating = False
    Dim xSheet As Worksheet
    Set xSheet = ActiveSheet
        If xSheet.Name <> "Definitions" And xSheet.Name <> "fx" And xSheet.Name <> "Needs" Then
            xSheet.Range("A1:C17 ").Copy
            xSheet.Range("J1:L17").PasteSpecial Paste:=xlValues, Operation:=xlNone, SkipBlanks:=False, Transpose:=False
        End If

    Application.ScreenUpdating = True
End Sub
This comment was minimized by the moderator on the site
Hello,

I'm currently at using the following code:


Private Sub CommandButton1_Click()
Dim xSWName As String
Dim xSheet As Worksheet
Dim xPSheet As Worksheet
Dim xIntR As Integer
xSWName = "Aktiva"
On Error Resume Next
Application.ScreenUpdating = False
Set xSheet = ActiveSheet
If xSheet.Name <> "Definitions" And xSheet.Name <> "fx" And xSheet.Name <> "Needs" Then
xSheet.Range("A6:F60 ").Copy
Set xPSheet = Worksheets.Item(xSWName)
xPSheet.Cells.PasteSpecial Paste:=xlValues, Operation:=xlNone, SkipBlanks:=False, Transpose:=False
End If
Application.ScreenUpdating = True
End Sub


But I would it to copy the text to the next empty cell, currently it just pastes it at the top and overwrites what's currently there.
Can someone help me, so that when I use this "script/marco" it goes to the next possible empty space?

Thanks in advance,
Calle
This comment was minimized by the moderator on the site
Hi Calle,
Do you want to fill blank cells with value above in a certian range in Excel?
If so, perhaps the methods in this post can do you a favor.
How To Fill Blank Cells With Value Above / Below / Left / Right In Excel?
If I am not understanding correctly, please attach a screenshot of your data to describe it more clearly.
This comment was minimized by the moderator on the site
Please excuse me, I found my omission...

On the other hand, this soul generates a mail per recipient whereas I wish to write a single email (grouped) to all the recipients. I can't find what to change...
Could you help me in solving this problem please?

Thank you again for your help,
Cordially. Have a good day.
This comment was minimized by the moderator on the site
Hi Clément,
To avoid this error "Dim xOutApp As Outlook.Application" -> Undefined user-defined type, you need to check the Microsoft Outlook 16.0 Object Library box as shown in the screenshot above.
The above VBA code helps to create a separate email to each recipient listed in cells.
If you want to create a single email with all email addresses displayed in the Recipients field (see screenshot below), the following VBA code can help you to do it.
https://www.extendoffice.com/images/stories/comments/comment-picture-zxm/button_email.png
Private Sub CommandButton1_Click()
'updateby Extendoffice 20220901
    Dim xOTApp As Object
    Dim xMItem As Object
    Dim xCell As Range
    Dim xRg As Range
    Dim xEmailAddr As String
    Dim xTxt As String
    On Error Resume Next
    xTxt = ActiveWindow.RangeSelection.Address
    Set xRg = Range("A1:A3")
    If xRg Is Nothing Then Exit Sub
    Set xOTApp = CreateObject("Outlook.Application")
    For Each xCell In xRg
        If xCell.Value Like "*@*" Then
            If xEmailAddr = "" Then
                xEmailAddr = xCell.Value
            Else
                xEmailAddr = xEmailAddr & ";" & xCell.Value
            End If
        End If
    Next
    Set xMItem = xOTApp.CreateItem(0)
    With xMItem
        .To = xEmailAddr
        .Subject = "Test"
        .Body = "Dear " _
                & vbNewLine & vbNewLine & _
                "This is a test email " & _
                "sending in Excel"
        .Display
    End With
End Sub
This comment was minimized by the moderator on the site
Thanks !
I made it but I have an error on this line : "Dim xOutApp As Outlook.Application" -> Undefined user-defined type

I don't understand because I made steps described in your message... Can you help me again please ? :-/


Thanks a lot !
This comment was minimized by the moderator on the site
Hi there ! Great page, very practical for me... !
Is it posible to copy datas (a list of mails) and paste it directly in "recipients" on Outlook ? If it's possible, I don't know how to do it...

Can you help me please ?
This comment was minimized by the moderator on the site
Hi Clement,
If you want to click a button then copy a list of email addresses and paste them directly in the "To" field in Outlook. The following VBA code can help.
After adding the code, please click Tools > Reference, then check the Microsoft Outlook 16.0 Object Library box.
https://www.extendoffice.com/images/stories/comments/comment-picture-zxm/outlook_object_library.png

Private Sub CommandButton1_Click()
'Updated by Extendoffice 20220831
    Dim xRg As Range
    Dim xRgEach As Range
    Dim xRgVal As String
    Dim xAddress As String
    Dim xOutApp As Outlook.Application
    Dim xMailOut As Outlook.MailItem
    On Error Resume Next
    xAddress = ActiveWindow.RangeSelection.Address
    Set xRg = Range("A1:A3")
    If xRg Is Nothing Then Exit Sub
    Application.ScreenUpdating = False
    Set xOutApp = CreateObject("Outlook.Application")
    Set xRg = xRg.SpecialCells(xlCellTypeConstants, xlTextValues)
    For Each xRgEach In xRg
        xRgVal = xRgEach.Value
        If xRgVal Like "?*@?*.?*" Then
            Set xMailOut = xOutApp.CreateItem(olMailItem)
            With xMailOut
                .To = xRgVal
                .Subject = "Test"
                .Body = "Dear " _
                      & vbNewLine & vbNewLine & _
                        "This is a test email " & _
                        "sending in Excel"
                .Display
                '.Send
            End With
        End If
    Next
    Set xMailOut = Nothing
    Set xOutApp = Nothing
    Application.ScreenUpdating = True
End Sub
This comment was minimized by the moderator on the site
Hi
i need to insert a button in each row to copy the specific cell rage on the row and past it on different excel in one drive , Ex, multiple teacher working on excel and entering the student date and click the button ( post button ) once they click the date has to be actively updated in student master file in new row, (its like a dynamic consolidation of work )

If Teacher is correcting the row and clicking the post button again it needs to be verify the cell which has unique id for the student and replace the row in master file not to create duplicate row on master file on each click , i need last updated date and time on the master file in separate cell at the end of the row
This comment was minimized by the moderator on the site
Hi suriya prakash,
I am very sorry that I cannot help you with this issue yet.
This comment was minimized by the moderator on the site
In case when I am copying from one sheet to another using the below code (Using Shape - Not Button) The Value From "ToCopySHEET"!A14 is copied to J7 when the A1:A6 are Used Range but J column is empty. I want to copy it into J:J irrespective the A, B or any other column is Used but If J is vacant It must start from the first empty cell of "CopiedSHEET"!J:J.


Sub CopyToSheet()
'Updated by Extendoffice 20220729
Dim xSWName As String
Dim xSheet As Worksheet
Dim xPSheet As Worksheet
Dim xIntR As Integer
xSWName = "Copy Test Page"
On Error Resume Next
Application.ScreenUpdating = False
Set xSheet = ActiveSheet
If xSheet.Name <> "Definitions" And xSheet.Name <> "fx" And xSheet.Name <> "Needs" Then
xSheet.Range("A14").Copy
Set xPSheet = Worksheets.Item(xSWName)
xIntR = xPSheet.UsedRange.Rows.Count
xPSheet.Cells(xIntR + 1, 10).PasteSpecial Paste:=xlValues, Operation:=xlNone, SkipBlanks:=False, Transpose:=False
End If
Application.ScreenUpdating = True
End Sub
There are no comments posted here yet
Load More
Please leave your comments in English
Posting as Guest
×
Rate this post:
0   Characters
Suggested Locations