Ga naar hoofdinhoud

Hoe automatisch een lege nieuwe rij invoegen met de Command-knop in Excel?

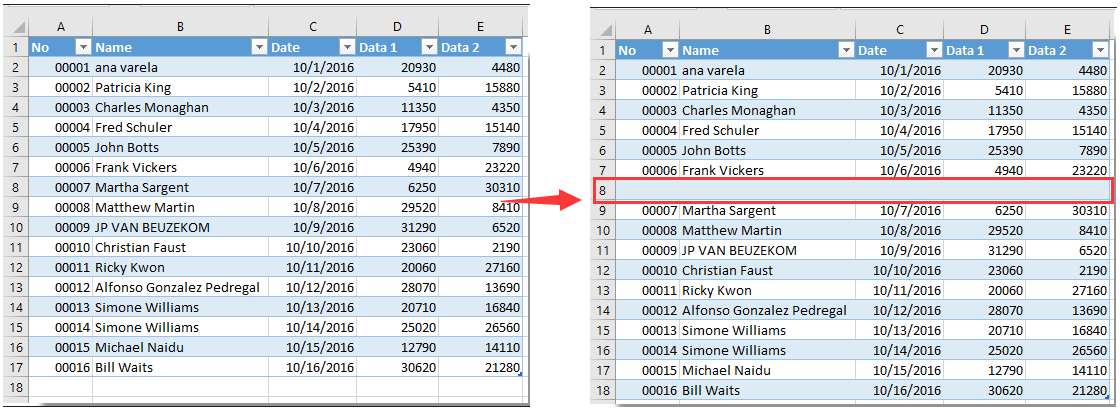
In veel gevallen moet u mogelijk een lege nieuwe rij invoegen op een opgegeven positie in uw werkblad. In dit artikel laten we u zien hoe u automatisch een lege nieuwe rij invoegt door op een opdrachtknop in Excel te klikken.

Voeg automatisch een lege nieuwe rij in met de Command-knop


Voeg automatisch een lege nieuwe rij in met de Command-knop

U kunt de volgende VBA-code uitvoeren om een ​​lege nieuwe rij in te voegen door op een opdrachtknop te klikken. Ga als volgt te werk.

1. Ten eerste moet u een Command-knop invoegen. Klik alstublieft Ontwikkelaar > Invoegen > Commandoknop (ActiveX-besturingselement). Zie screenshot:

2. Teken vervolgens een Command-knop in het werkblad dat u nodig hebt om nieuwe rijen toe te voegen, klik met de rechtermuisknop op de Command-knop en klik Properties vanuit het rechtsklikmenu.

3. In de Properties dialoogvenster, voert u de weergegeven tekst van de Command-knop in het Onderschrift doos onder de Gecategoriseerd tabblad en sluit vervolgens het dialoogvenster.

U kunt zien dat de weergegeven tekst van de Command-knop is gewijzigd zoals onderstaand screenshot.

4. Klik nogmaals met de rechtermuisknop op de Command-knop en klik vervolgens op Bekijk code vanuit het rechtsklikmenu.

5. Vervolgens de Microsoft Visual Basic voor toepassingen -venster, vervangt u de originele code door de onderstaande VBA-code in het Code venster.

VBA-code: voeg automatisch een lege nieuwe rij in met de Command-knop

Private Sub CommandButton1_Click()
    Dim rowNum As Integer
    On Error Resume Next
    rowNum = Application.InputBox(Prompt:="Enter Row Number where you want to add a row:", _
                                    Title:="Kutools for excel", Type:=1)
    Rows(rowNum & ":" & rowNum).Insert Shift:=xlDown
End Sub

Note: In de code is CommanButton1 de naam van de Command-knop die u hebt gemaakt.

6. druk op anders + Q toetsen tegelijk om het Microsoft Visual Basic voor toepassingen venster. En zet het Ontwerpmodus onder de Ontwikkelaar Tab.

7. Klik op de ingevoegde Command-knop en een Kutools for Excel dialoogvenster verschijnt. Voer een bepaald rijnummer in waar u een lege nieuwe rij wilt toevoegen en klik vervolgens op OK knop. Zie screenshot:

Vervolgens wordt de lege nieuwe rij ingevoegd op een opgegeven positie van uw werkblad, zoals onderstaand screenshot. En het behoudt de celopmaak van de bovenstaande cel.


Gerelateerde artikelen:

Beste Office-productiviteitstools

🤖 Kutools AI-assistent: Een revolutie teweegbrengen in de data-analyse op basis van: Intelligente uitvoering   |  Genereer code  |  Aangepaste formules maken  |  Analyseer gegevens en genereer grafieken  |  Roep Kutools-functies aan...
Populaire functies: Zoek, markeer of identificeer duplicaten   |  Verwijder lege rijen   |  Combineer kolommen of cellen zonder gegevens te verliezen   |   Ronde zonder formule ...
Super opzoeken: Meerdere criteria VLookup    VLookup met meerdere waarden  |   VOpzoeken over meerdere bladen   |   Fuzzy opzoeken ....
Geavanceerde vervolgkeuzelijst: Maak snel een vervolgkeuzelijst   |  Afhankelijke vervolgkeuzelijst   |  Multi-select vervolgkeuzelijst ....
Kolom Beheerder: Voeg een specifiek aantal kolommen toe  |  Kolommen verplaatsen  |  Schakel de zichtbaarheidsstatus van verborgen kolommen in  |  Vergelijk bereiken en kolommen ...
Uitgelichte functies: Raster focus   |  Ontwerpweergave   |   Grote formulebalk    Werkmap- en bladbeheer   |  resource Library (Auto-tekst)   |  Datumkiezer   |  Combineer werkbladen   |  Cellen coderen/decoderen    Stuur e-mails per lijst   |  Super filter   |   Speciaal filter (filter vet/cursief/doorhalen...) ...
Top 15 gereedschapsets12 Tekst Tools (toe te voegen tekst, Tekens verwijderen, ...)   |   50+ tabel Types (Gantt Chart, ...)   |   40+ Praktisch Formules (Bereken leeftijd op basis van verjaardag, ...)   |   19 Invoeging Tools (QR-code invoegen, Afbeelding invoegen vanaf pad, ...)   |   12 Camper ombouw Tools (Getallen naar woorden, Currency Conversion, ...)   |   7 Samenvoegen en splitsen Tools (Geavanceerd Combineer rijen, Gespleten cellen, ...)   |   ... en meer

Geef uw Excel-vaardigheden een boost met Kutools voor Excel en ervaar efficiëntie als nooit tevoren. Kutools voor Excel biedt meer dan 300 geavanceerde functies om de productiviteit te verhogen en tijd te besparen.  Klik hier om de functie te krijgen die u het meest nodig heeft...

Omschrijving


Office-tabblad Brengt een interface met tabbladen naar Office en maakt uw werk veel gemakkelijker

  • Schakel bewerken en lezen met tabbladen in Word, Excel, PowerPoint in, Publisher, Access, Visio en Project.
  • Open en maak meerdere documenten in nieuwe tabbladen van hetzelfde venster in plaats van in nieuwe vensters.
  • Verhoogt uw productiviteit met 50% en vermindert honderden muisklikken voor u elke dag!
Comments (26)
No ratings yet. Be the first to rate!
This comment was minimized by the moderator on the site
Bedankt voor je uitleg. Ik heb de formule toegepast maar bekom dat ik maar 1 lijn kan toevoegen. Daarna laat de knop het niet meer toe en moet ik eerst mijn toegevoegde rij verwijderen. Is er een manier om dit aan te passen?
This comment was minimized by the moderator on the site
Is there a way to make to row inset always below the last entry?
This comment was minimized by the moderator on the site
How do I do the opposite of this and create a button that will delete a row?
This comment was minimized by the moderator on the site
Hi Big Ant,

Here's the modified code to delete a specified row when the Command Button is clicked:


Private Sub CommandButton1_Click()
'Updated by Extendoffice 20230817
    Dim rowNum As Integer
    On Error Resume Next
    rowNum = Application.InputBox(Prompt:="Enter Row Number which you want to delete:", _
                                    Title:="Kutools for excel", Type:=1)
    If rowNum <> 0 Then
        Rows(rowNum).Delete Shift:=xlUp
    End If
End Sub
This comment was minimized by the moderator on the site
Criei uma linha e nomeei como spotB,
Mudei a altura da linha para 0,01 para ocultá-la (apenas por estética).
Criei um botão:
Application.Goto Reference:="spotB"
Selection.EntireRow.Insert

Problema resolvido.

Obrigado pelos códigos a Mah e crystal, mas eu tinha 8 títulos para separar, cada um inserindo linhas quando necessário ao usuário, e não queria nenhuma pergunta sobre quantidade de linhas, os usuários não leem perguntas e clicam logo em OK, depois reclamam...
This comment was minimized by the moderator on the site
... Testei os códigos acima, mas, como se trata de pessoas que vão usar, não é viável os box que pedem a linha e a quantidade, não dá...
This comment was minimized by the moderator on the site
Caros colegas, após pesquisar (bastante) na net não consegui encontrar um atalho, comando, código, nada, nada, que eu possa usar para inserir em uma macro APENAS uma forma de inserir uma linha ABAIXO da célula ativa. Isto porquê se eu gravar o endereço da célula, ele não muda, fica sempre na mesma célula e as seguintes não vão ficar corretamente abaixo, e se eu usar um endereço de célula fixo, a linha tem que ser inserida acima, mas não formata da forma desejada, que seria o formato das linhas de cima.

Acho que o código existe, só não encontro, já tentei várias formas, selecionando um fixo, subindo uma linha e pedindo para inserir após, mas as seguintes não funcionam de acordo.

Alguém poderia me ajudar?
This comment was minimized by the moderator on the site
Hi

I used the code but wanted to add rows with formulas, therefore I added the last line to be able to add the rows with formulas.
However, in my excel file and in column "F" I have a text which can be entered manually and would be different in different cases. Therefore, I would like to add rows below the reference row with keeping the formulas and values in all cells except the cell from column "F" which I would like to be copied as blank!
Could you please help me with what should I add to the underneath code to be able to have the cells of column "F" blank whenever I add a row with this code?
thanks in advance!

Private Sub CommandButton1_Click()
Dim xIntRrow As Integer
Dim rowNum As Integer
On Error Resume Next
rowNum = Application.InputBox(Prompt:="Enter Row Number where you want to add a row:", _
Title:="Kutools for excel", Type:=1)
xIntRrow = Application.InputBox(Prompt:="Type in the number of rows you want to insert", _
Title:="Kutools for excel", Type:=1)
Rows(rowNum + 1 & ":" & rowNum + 1).EntireRow.Resize(xIntRrow).Insert Shift:=xlShiftDown
Rows(rowNum).Resize(xIntRrow + 1).FillDown

End Sub
This comment was minimized by the moderator on the site
Hi Mah,
The following VBA code may do you a favor. Please give it a try. Thank you.

Private Sub CommandButton1_Click()
'Updated by Extendoffice 20220707
    Dim rowNum As Integer
    Dim xRg1, xRg2 As Range
    
    On Error Resume Next
    
    rowNum = Application.InputBox(Prompt:="Enter Row Number where you want to add a row:", _
                                    Title:="Kutools for excel", Type:=1)
    
    Rows(rowNum & ":" & rowNum).Insert Shift:=xlDown
    Rows((rowNum - 1) & ":" & (rowNum - 1)).Copy
    Rows(rowNum & ":" & rowNum).Select
    Selection.PasteSpecial Paste:=xlPasteAll, Operation:=xlNone, SkipBlanks:= _
        False, Transpose:=False
    Range("F" & rowNum).Value = ""
End Sub
This comment was minimized by the moderator on the site
Sub AddNewRow()


Private Sub CommandButton1_Click()

ActiveSheet.Unprotect Password:="1234"


Dim mySheets

Dim i As Long


mySheets = Array("Sheet2")


For i = LBound(mySheets) To UBound(mySheets)

With Sheets(mySheets(i))

.Range("B10").EntireRow.Insert Shift:=xlDown

.Range("B10:H10").Borders.Weight = xlThin

End With

Next i


ActiveSheet.Protect Password:="1234"


End Sub

I don't know if this will work for you. It worked quite well for me. I even left unprotected cells that you can input data and the formulas are still active. Took me a whole day to figure it out. replace "1234" with whatever password you feel like, "Sheet2" with the Sheet you are working with and input the range you want.
The code first unprotects the worksheet, adds row and protects the worksheet.
This comment was minimized by the moderator on the site
is it possible to create in a different sheet? I really need that
This comment was minimized by the moderator on the site
can possible insert multiple sheet row at one time click by this .
This comment was minimized by the moderator on the site
Hi,
The below code can help you solve the problem. Please have a try.

Private Sub CommandButton1_Click()
Dim xIntRrow As Integer
Dim rowNum As Integer
On Error Resume Next
rowNum = Application.InputBox(Prompt:="Enter Row Number where you want to add a row:", _
Title:="Kutools for excel", Type:=1)
xIntRrow = Application.InputBox(Prompt:="Type in the number of rows you want to insert", _
Title:="Kutools for excel", Type:=1)
Rows(rowNum + 1 & ":" & rowNum + 1).EntireRow.Resize(xIntRrow).Insert Shift:=xlShiftDown

End Sub
There are no comments posted here yet
Load More
Please leave your comments in English
Posting as Guest
×
Rate this post:
0   Characters
Suggested Locations