Hoe maak je een keuzelijst met meerdere selectievakjes in Excel?
Traditionele keuzelijsten in Excel beperken gebruikers tot enkele selecties. Om deze beperking te overwinnen en meerdere selecties mogelijk te maken, zullen we twee praktische methoden verkennen om keuzelijsten met meerdere selectievakjes te maken.
Gebruik een lijstvak om een keuzelijst met meerdere selectievakjes te maken
A: Maak een lijstvak met brongegevens
B: Geef de cel een naam waarin je de geselecteerde items wilt plaatsen
C: Voeg een vorm in om de geselecteerde items weer te geven
Maak eenvoudig een keuzelijst met selectievakjes met behulp van een geweldig hulpmiddel
Meer handleidingen voor keuzelijsten...
Gebruik een lijstvak om een keuzelijst met meerdere selectievakjes te maken
Zoals te zien is in de onderstaande schermafbeelding, alle namen in het bereik A2:A11 in het huidige werkblad dienen als brongegevens voor het lijstvak dat zich in cel C4 bevindt. Door op dit vak te klikken, wordt de lijst met items die je kunt selecteren uitgevouwen, en de geselecteerde items worden weergegeven in cel E4. Volg deze stappen om dit te bereiken:

A. Maak een lijstvak met brongegevens
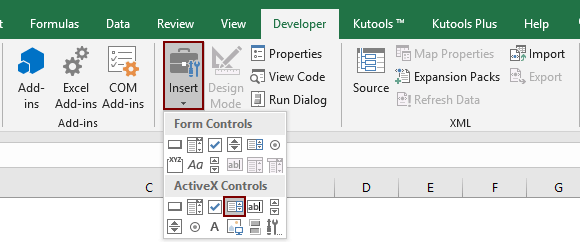
1. Klik op Ontwikkelaar > Invoegen > Lijstvak (ActiveX-besturingselement). Zie schermafbeelding:
2. Teken een lijstvak in het huidige werkblad, klik er met de rechtermuisknop op en selecteer Eigenschappen in het rechtermuisknopmenu.

3. Stel in het dialoogvenster Eigenschappen het volgende in.
- 3.1 Voer in het vak ListFillRange het bronbereik in dat je in de lijst wilt weergeven (hier voer ik het bereik A2:A11 in);
- 3.2 Selecteer in het vak ListStyle 1 - fmListStyleOption;
- 3.3 Selecteer in het vak MultiSelect 1 – fmMultiSelectMulti;
- 3.4 Sluit het dialoogvenster Eigenschappen. Zie schermafbeelding:


B: Geef de cel een naam waarin je de geselecteerde items wilt plaatsen
Als je alle geselecteerde items in een specifieke cel zoals E4 wilt weergeven, doe dan het volgende.
1. Selecteer cel E4, voer ListBoxOutput in het Naamvak in en druk op de Enter-toets.

C. Voeg een vorm in om de geselecteerde items weer te geven
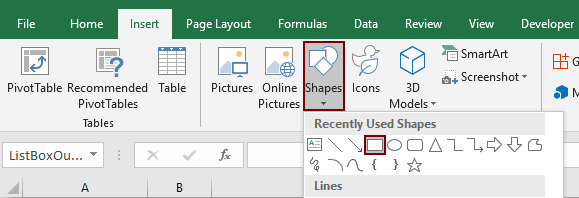
1. Klik op Invoegen > Vormen > Rechthoek. Zie schermafbeelding:
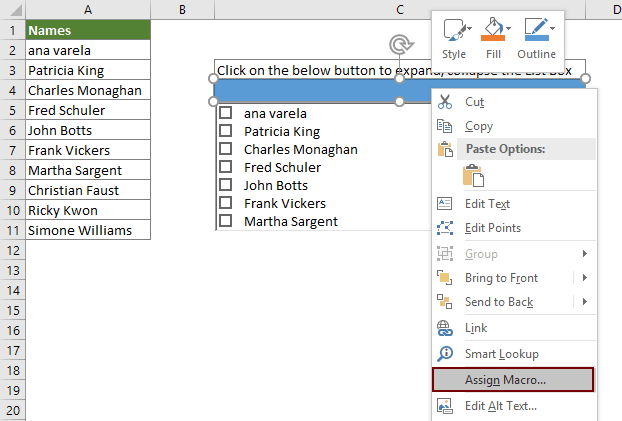
2. Teken een rechthoek in je werkblad (hier teken ik de rechthoek in cel C4). Klik vervolgens met de rechtermuisknop op de rechthoek en selecteer Macro toewijzen in het rechtermuisknopmenu.
3. Klik in het dialoogvenster Macro toewijzen op de knop Nieuw.

4. Vervang in het venster Microsoft Visual Basic for Applications de originele code in het Module-venster door de onderstaande VBA-code.
VBA-code: Maak een lijst met meerdere selectievakjes
Sub Rectangle1_Click()
'Updated by Extendoffice 20200730
Dim xSelShp As Shape, xSelLst As Variant, I, J As Integer
Dim xV As String
Set xSelShp = ActiveSheet.Shapes(Application.Caller)
Set xLstBox = ActiveSheet.ListBox1
If xLstBox.Visible = False Then
    xLstBox.Visible = True
    xSelShp.TextFrame2.TextRange.Characters.Text = "Pickup Options"
    xStr = ""
    xStr = Range("ListBoxOutput").Value

    If xStr <> "" Then
         xArr = Split(xStr, ";")
    For I = xLstBox.ListCount - 1 To 0 Step -1
        xV = xLstBox.List(I)
        For J = 0 To UBound(xArr)
            If xArr(J) = xV Then
              xLstBox.Selected(I) = True
              Exit For
            End If
        Next
    Next I
    End If
Else
    xLstBox.Visible = False
    xSelShp.TextFrame2.TextRange.Characters.Text = "Select Options"
    For I = xLstBox.ListCount - 1 To 0 Step -1
        If xLstBox.Selected(I) = True Then
        xSelLst = xLstBox.List(I) & ";" & xSelLst
        End If
    Next I
    If xSelLst <> "" Then
        Range("ListBoxOutput") = Mid(xSelLst, 1, Len(xSelLst) - 1)
    Else
        Range("ListBoxOutput") = ""
    End If
End If
End Sub
Opmerking: In de code is Rectangle1 de vormnaam; ListBox1 is de naam van het lijstvak; Select Options en Pickup Options zijn de weergegeven teksten van de vorm; en ListBoxOutput is de celnaam van de uitvoercel. Je kunt ze naar behoefte aanpassen.
5. Druk gelijktijdig op Alt + Q om het venster Microsoft Visual Basic for Applications te sluiten.
6. Door op de rechthoekknop te klikken, vouwt of vouwt de lijst zich uit. Wanneer de lijst is uitgevouwen, selecteer de gewenste items door ze aan te vinken. Klik vervolgens opnieuw op de rechthoek om alle geselecteerde items in cel E4 weer te geven. Zie de onderstaande demo:
7. Sla het werkboek vervolgens op als een Excel MacroEnabled Workbook om de code in de toekomst opnieuw te gebruiken.
Maak een keuzelijst met selectievakjes met behulp van een geweldig hulpmiddel
Genoeg van complexe VBA-codering? Kutools for Excel maakt het eenvoudig om keuzelijsten met selectievakjes te maken voor naadloze meervoudige selectie. Perfect voor enquêtes, gegevensfiltering of dynamische formulieren, dit gebruiksvriendelijke hulpmiddel stroomlijnt je workflow en bespaart tijd.
1. Open het werkblad waarin je gegevensvalidatie hebt ingesteld voor de keuzelijst, klik op Kutools > Keuzelijst > Geavanceerde keuzelijst inschakelen. Klik vervolgens op Keuzelijst met selectievakjes in het menu Keuzelijst. Zie schermafbeelding:
 |  |
2. Configureer in het dialoogvenster Selectievakjes toevoegen aan de keuzelijst als volgt.
- 2.1) Selecteer de cellen die de keuzelijst bevatten;
- 2.2) Voer in het vak Scheidingsteken een scheidingsteken in dat je wilt gebruiken om de meerdere items te scheiden;
- 2.3) Schakel de optie Zoekfunctie inschakelen in indien nodig. (Als je deze optie inschakelt, kun je later zoeken in de keuzelijst.)
- 2.4) Klik op de knop OK.


Vanaf nu, wanneer je op de cel met de keuzelijst klikt, verschijnt een lijstvak. Selecteer items door de selectievakjes aan te vinken om ze in de cel weer te geven zoals in de onderstaande demo te zien is.
Voor meer details over deze functie, bezoek deze handleiding.
Kutools voor Excel - Boost Excel met meer dan 300 essentiële tools. Geniet van permanent gratis AI-functies! Nu verkrijgen
Dit artikel biedt twee methoden om eenvoudig keuzelijsten met selectievakjes te maken in Excel. Je kunt kiezen welke je liever gebruikt. Als je geïnteresseerd bent in het verkennen van meer Excel-tips en -trucs, onze website biedt duizenden handleidingen.
Gerelateerde artikelen:
Automatisch aanvullen bij typen in Excel-keuzelijst
Als je een gegevensvalidatie-keuzelijst hebt met veel waarden, moet je omlaag scrollen in de lijst om de juiste te vinden, of de hele woord rechtstreeks in het lijstvak typen. Als er een methode zou zijn die automatisch aanvult wanneer je de eerste letter in de keuzelijst typt, wordt alles gemakkelijker. Deze handleiding biedt de methode om het probleem op te lossen.
Maak een keuzelijst vanuit een ander werkboek in Excel
Het is vrij eenvoudig om een gegevensvalidatie-keuzelijst te maken tussen werkbladen binnen een werkboek. Maar als de lijstgegevens die je nodig hebt voor de gegevensvalidatie zich in een ander werkboek bevinden, wat doe je dan? In deze handleiding leer je hoe je een keuzelijst vanuit een ander werkboek in Excel maakt.
Maak een doorzoekbare keuzelijst in Excel
Voor een keuzelijst met talloze waarden is het vinden van de juiste niet eenvoudig. Eerder hebben we een methode geïntroduceerd om een keuzelijst automatisch aan te vullen wanneer je de eerste letter in het keuzelijstvak typt. Naast de automatische aanvulling kun je de keuzelijst ook doorzoekbaar maken om de werkefficiëntie te verbeteren bij het vinden van de juiste waarden in de keuzelijst. Voor het maken van een doorzoekbare keuzelijst, probeer de methode in deze handleiding.
Automatisch andere cellen invullen bij het selecteren van waarden in Excel-keuzelijst
Stel dat je een keuzelijst hebt gemaakt op basis van de waarden in het celbereik B8:B14. Wanneer je een waarde in de keuzelijst selecteert, wil je dat de bijbehorende waarden in het celbereik C8:C14 automatisch worden ingevuld in een geselecteerde cel. Om dit probleem op te lossen, zullen de methoden in deze handleiding je helpen.
Beste productiviteitstools voor Office
Verbeter je Excel-vaardigheden met Kutools voor Excel en ervaar ongeëvenaarde efficiëntie. Kutools voor Excel biedt meer dan300 geavanceerde functies om je productiviteit te verhogen en tijd te besparen. Klik hier om de functie te kiezen die je het meest nodig hebt...
Office Tab brengt een tabbladinterface naar Office en maakt je werk veel eenvoudiger
- Activeer tabbladbewerking en -lezen in Word, Excel, PowerPoint, Publisher, Access, Visio en Project.
- Open en maak meerdere documenten in nieuwe tabbladen van hetzelfde venster, in plaats van in nieuwe vensters.
- Verhoog je productiviteit met50% en bespaar dagelijks honderden muisklikken!
Alle Kutools-invoegtoepassingen. Eén installatieprogramma
Kutools for Office-suite bundelt invoegtoepassingen voor Excel, Word, Outlook & PowerPoint plus Office Tab Pro, ideaal voor teams die werken met Office-toepassingen.
- Alles-in-één suite — invoegtoepassingen voor Excel, Word, Outlook & PowerPoint + Office Tab Pro
- Eén installatieprogramma, één licentie — in enkele minuten geïnstalleerd (MSI-ready)
- Werkt beter samen — gestroomlijnde productiviteit over meerdere Office-toepassingen
- 30 dagen volledige proef — geen registratie, geen creditcard nodig
- Beste prijs — bespaar ten opzichte van losse aanschaf van invoegtoepassingen